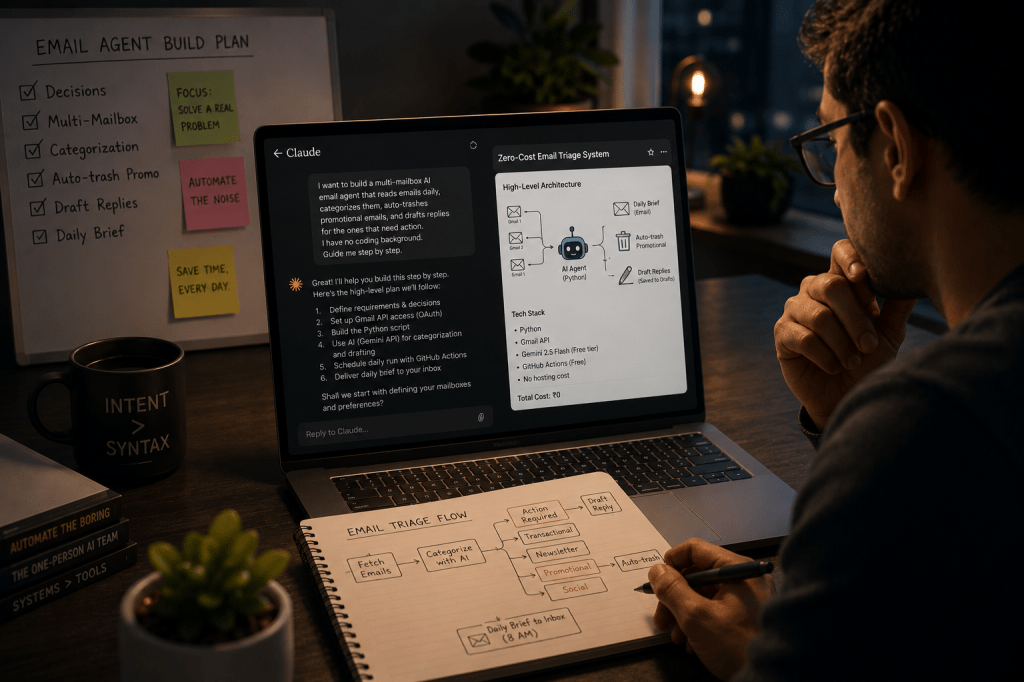
Over the last weeks I have shared my journey of how I started working on email automation & progressed from a single mailbox automation through Claude cowork to building a fully automated AI email agent that runs at 8am every day, reads three inboxes, trashes promotional noise, and drafts replies in my voice.
All this at 0 cost to build or to maintain.
While anyone can of course build this kind of workflow using Claude or other LLMs but during the build there were various approaches & decisions I had to take.
So this week I decided to document the entire process of how you can build this agentic workflow for yourself as well with help from Claude so that you can skip some of the lengthy conversations with Claude I had to do.
Believe me once you build this workflow you will find that the same approach transfers to every build after this one.
Breaking the mental barrier
The first most important thing before you start is breaking the mental barrier that building apps or agents etc. is something only a software developer can do or they think they can’t build something without understanding the technology first.
Result – They see words like “OAuth Consent Screen” or “GitHub Actions workflow” and either close the tab or spend hours watching YouTube before writing anything.
In the age of AI where LLMs can now write pretty good code what’s important is to understand is the system you want to build — what it does, where the boundaries are, and what decisions only you can make.
Claude handles the code. You handle the architecture.
Once you make this shift, every technical obstacle becomes a conversation instead of a blocker.
What you will build
A fully automated AI email agent that does four things without you touching anything:
- Reads emails from multiple Gmail accounts daily (Outlook and Live accounts forward to Gmail — covered in Phase 3).
- Delivers one consolidated HTML brief to your inbox every morning: Action Required, Transactional, Newsletters, Promotional, Social — all accounts, already sorted.
- Auto-trashes Promotional emails from your chosen mailbox (recoverable from Trash — not permanently deleted).
- Drafts replies to Action Required emails in your voice, saved to Drafts for you to review and approve.
The agent never sends automatically. That boundary doesn’t move.
Total build time: one focused weekend session.
Phase 0: Make your decisions before you touch anything (15 minutes)
This part is most important & best to close on this before you start instead of doing this in between the build.
Before opening Claude or any tool, answer four questions:
- Which Gmail accounts do you want to include? Write down each address, what you use it for, and a short label — Personal, Work, Role, Admin.
- Which account sends the brief? This is the account the script uses to email you the daily summary. Usually your most active Gmail.
- Which account receives the brief? Where you want it to land each morning. Usually your personal Gmail.
- Which mailbox gets auto-trash for Promotional emails? Only choose a mailbox where missing a promotional email has zero consequence. Personal mailboxes are usually safe. Work or role-based mailboxes — be cautious.
- Which mailbox gets auto-drafted replies? Best suited for a mailbox where you receive similar types of requests repeatedly. A role-based mailbox works better than a personal one for this.
Write the answers down before moving to Phase 1. The clearer your decisions here, the faster everything after.
Phase 1: No-code tool or Python?
My first real conversation with Claude was about which direction to go.
I didn’t know whether to use a visual no-code tool like n8n or Zapier, or build with Python and GitHub.
I asked Claude to walk me through the trade-offs for someone with no coding background.
The prompt I used:
“I want to build a multi-mailbox AI email agent. It should read emails from multiple Gmail accounts daily, categorise them using AI, auto-trash promotional emails, and draft replies to emails that need a response. I have no coding background. Should I use a no-code tool like n8n, Zapier, or Make or build this with Python and GitHub? Walk me through the trade-offs for someone at my stage.”
What came back was clear. No-code tools cost ₹750–2,000 per month ongoing.
What you learn stays locked inside that specific tool. Python and GitHub cost nothing permanently and the logic transfers to every future build.
I chose Python and GitHub. The cost difference was reason enough.
The fact that I could say “I built this from scratch” rather than “I connected some nodes in Zapier” was a bonus.
Phase 2: Which AI model does the work?
The script needed an AI model to categorise emails and draft replies.
I had assumed this was where quality would matter most.
It turned out to be the least important decision of the build.
I asked Claude:
“I want to use an AI model to categorise emails and draft replies inside a Python script that runs daily on GitHub Actions. I want zero or near-zero cost. My options are Gemini API free tier, OpenAI API paid per call, or Anthropic Claude API paid per call. Which should I use for this use case and why? Is quality a meaningful difference for email categorisation and short draft replies?”
The answer: for this use case, model quality is not the bottleneck.
Gemini 2.5 Flash handles email categorisation and short draft replies comfortably.
GPT-4o Mini and Claude Haiku would do the same job but add cost unnecessarily.
I went with Gemini 2.5 Flash on the free tier.
One trap to avoid: if you link your Gemini API key to a billing account, Google zeroes out your free tier quota entirely.
Every call fails. Always create a brand new Google project with no billing account attached for this key.
Phase 3: Set up the plumbing
This is the most time-consuming phase. None of it is difficult but there are several steps and a few traps.
Sharing all steps & relevant points.
Non-Gmail mailboxes
I had an Outlook account I wanted to include.
The Gmail API only works with Gmail, so I asked Claude for the simplest workaround.
The answer was email forwarding — enable forwarding from Outlook to one of my Gmail accounts.
I did this first and sent a test email to confirm it arrived before moving on.
Obvious in hindsight, but worth verifying before building anything on top of it.
Google Cloud setup
I asked Claude to walk me through this step by step:
“Walk me through setting up Google Cloud Console to enable the Gmail API for my email agent. I need to create a project, enable the Gmail API, configure the OAuth consent screen, create OAuth credentials and download the JSON, and add my Gmail accounts as test users. Guide me step by step and tell me what to click on each screen.”
Two traps here to avoid & infact the 2nd one broke my workflow before I fixed it.
First: after creating OAuth credentials, a popup shows your Client ID and Client Secret. Download the JSON before closing that popup. The client secret cannot be retrieved again after you close it. I almost missed this.
Second: after setup, go to Audience and click Publish App. This moves your app from Testing to Production mode. In Testing mode, your refresh tokens expire every 7 days and you have to regenerate them repeatedly. In Production mode they don’t expire.
Gemini API key
I asked Claude to walk me through getting the key from Google AI Studio specifically from a project with no billing account — based on what I had already learned in Phase 2. This took five minutes.
Refresh tokens
This was the step that was completely new to me and something that would really make you feel like a coder as all this happens in terminal.
A refresh token is a permanent permission slip that lets the script access Gmail on your behalf without you logging in every time.
One per account, generated once.
I asked Claude to write a token generation script:
“I need to generate OAuth refresh tokens for each of my Gmail accounts so my script can access them without me logging in every time. Write me a Python script called get_tokens.py that uses these three scopes — gmail.readonly, gmail.send, gmail.modify — reads credentials from credentials.json, loops through a list of accounts I define, opens a browser for each account and prints the refresh token, and pauses between accounts so I can copy each token before continuing.”
I ran the script, a browser opened for each account, I logged in with the correct account each time and copied every token.
Straightforward once I understood what I was doing.
Important to remember: The script runs on GitHub, not on your system. Updating tokens locally does nothing. Always update GitHub Secrets after regenerating. Believe me spent 20 minutes debugging this only to find I was the one not doing what I was supposed to.
GitHub repository
While if you use Claude code this would be automatic but if you would like to do this manually like I did only need to ask Claude to guide you to creating a private repo, the files that you need to add, and how to add GitHub Secrets for all the credentials — GMAIL_CLIENT_ID, GMAIL_CLIENT_SECRET, one REFRESH_TOKEN per account, and GEMINI_API_KEY.
Before moving to Phase 4, verify: forwarding confirmed, Google Cloud project created, Gmail API enabled, OAuth consent screen configured, all Gmail accounts added as test users, app published to Production, credentials.json downloaded, Gemini API key from a billing-free project, all refresh tokens saved, GitHub private repo created, all secrets added.
Phase 4: Build the main script
This is the core conversation. Need to give Claude specific account details, the functions you need, and exactly which mailbox should get auto-trash and which should get draft replies.
“Write a Python script called email_brief.py that does the following:
Three Gmail accounts: Account 1 [your email, label Personal, env REFRESH_TOKEN_PERSONAL], Account 2 [your email, label Work, env REFRESH_TOKEN_WORK], Account 3 [your email, label Role, env REFRESH_TOKEN_ROLE].
Sender email: [your sender]. Recipient email: [your recipient].
Functions needed: get_gmail_service to build Gmail API service from environment variables.
fetch_emails to fetch last 24 hours excluding sent and drafts. fetch_full_body to fetch complete email body.
call_gemini to call Gemini 2.5 Flash via urllib.request with no library.
categorize_emails to build an HTML brief with dark navy header, email counts per mailbox, and coloured category borders.
get_promotional_ids to return a JSON array of promotional email IDs only — strict: only mass marketing, never newsletters, social notifications, bank alerts, or personal emails.
trash_promotional_emails to call Gmail trash API for each ID. get_action_required_ids to return a JSON array of emails needing a reply.
generate_and_save_draft to draft a reply in my voice and save it as a Gmail draft — never send automatically.
send_brief to send the HTML brief via Gmail API.
Auto-trash runs for the Personal mailbox. Draft replies run for the Role mailbox. All credentials from environment variables.”
After Claude generates the script: read through it once you don’t need to understand every line, just check your email addresses and labels are correct.
If anything looks wrong, tell Claude specifically what to fix. Paste the script into GitHub as email_brief.py.
Also ask Claude: “What goes in requirements.txt for this script?” and “Write the GitHub Actions workflow file for this script, triggered only by workflow_dispatch.” Add both files to the repo.
Phase 5: Build your draft reply voice
Skip this phase if you did not choose a mailbox for draft replies.
The best approach: find 5-10 real emails you have previously sent from that mailbox and paste them into Claude.
“I want my email agent to draft replies in my voice for my Role mailbox. I am going to paste real emails I have sent from this mailbox. Read them and extract my tone, how I open emails, how I sign off, how I handle complaints versus requests versus FYI emails, and any phrases I use consistently. Then write a voice profile I can embed in my draft generation prompt. [PASTE YOUR EMAILS]”
Once Claude gives you the voice profile:
“Update the generate_and_save_draft function in my email_brief.py to use this voice profile: [PASTE PROFILE]. Add this instruction: reply only to the most recent message in the thread, not older quoted messages. Match reply length to the email — a simple FYI needs 2-3 sentences, not a full response.”
Phase 6: Test and fix
The first run will almost certainly fail. That is normal. Every build does.
Go to your GitHub repo → Actions tab → Daily Email Brief → Run workflow → green Run workflow button.
Wait 2-4 minutes. Green tick means success. Red cross means failure — click the failed job and scroll through the log to find the error.
When it fails, give Claude the error:
“My GitHub Actions workflow failed. Here is the error log: [PASTE THE FULL LOG]. What went wrong and how do I fix it?”
The most common errors:
invalid_scope: Bad Requestmeans tokens were generated without the gmail.modify scope — update SCOPES in get_tokens.py, revoke old tokens at myaccount.google.com/permissions, regenerate all tokens, update GitHub Secrets.quota exceeded / limit: 0means the Gemini API key is linked to a billing account — create a new key in a new billing-free project.invalid_grant: expired or revokedmeans the OAuth app is still in Testing mode — publish to Production and regenerate tokens.IndentationErrormeans the GitHub web editor broke Python formatting.
Ask Claude for the complete file and replace everything at once instead of doing piecemeal fixes as that almost always cause some formatting error etc.
The most common mistake at this stage: regenerating tokens on your Mac but forgetting to update GitHub Secrets. The script runs on GitHub, not your computer.
Phase 7: Fix the scheduling
GitHub’s built-in cron scheduler on free accounts runs 2-3 hours late. cron-job.org fixes this in ten minutes.
“My GitHub Actions workflow runs late every day because of GitHub free tier scheduler delays. Walk me through: creating a GitHub Personal Access Token with workflow scope, setting up a cronjob at cron-job.org that sends a POST request to the GitHub API to trigger my workflow_dispatch event, the correct cron syntax for 8am in my timezone, and what to do once cron-job.org is working to prevent duplicate briefs.”
Once cron-job.org is confirmed working after two days, remove the schedule section from daily_brief.yml. Keep workflow_dispatch so cron-job.org can still trigger it.
Phase 8: Tune after launch
Run for 5-7 days before changing anything. Get a baseline first. Then:
- If newsletters or social emails are being trashed: “Update the get_promotional_ids prompt to be more conservative — only clearly mass marketing emails, explicitly excluding newsletters and social notifications.”
- If draft replies are too long: “Add an instruction: match reply length to the email received — a simple FYI needs 2-3 sentences maximum.”
- If you want to add another mailbox: “I want to add a fourth Gmail account to my email agent. Walk me through adding it to ACCOUNTS, generating a new refresh token, adding the secret to GitHub, and updating the workflow YAML.”
What you have actually built
There is a distinction worth being precise about.
An AI workflow observes and reports. You still act on everything.
The email brief on its own — categorised, formatted, delivered — is a workflow. You read it. You decide. You act.
The moment auto-trash and draft replies entered the picture, it became agentic.
The AI is now taking actions in your inbox on your behalf not just telling you what is there.
You moved from information consumer to approval layer.
That distinction matters for how you talk about what you built. To your team, your manager, or anyone who asks how you spent your weekend.
Final Word
I spent about 30 minutes getting the code working.
I spent three hours after that fixing the handoff points the places where the agent and I needed to agree on a boundary.
Which emails count as promotional. What “reply in my voice” actually means. When to draft and when to stay silent.
The code wasn’t the hard part, the architecture was. And architecture doesn’t require a CS degree.
It requires knowing what you want and being specific enough to tell Claude exactly that.
That’s the future we all talked about & it’s already here!!
Found this useful? I will continue sharing practical strategies for operationalising AI in future editions of The Abhay Perspective. Subscribe below and to my LinkedIn newsletter for future updates.
If you want to explore how any of this applies to your context, let’s talk. https://theabhayperspective.com/work-with-me/





Leave a Reply