Last week in my Vibe Managing 101 article, I promised we would move beyond theory and into execution.
We covered the foundation. We talked about how to think like a Vibe Manager, how to identify repeatable work, how to write better briefs, and why most people fail because they start with tools instead of structure.
Now it is time to build.
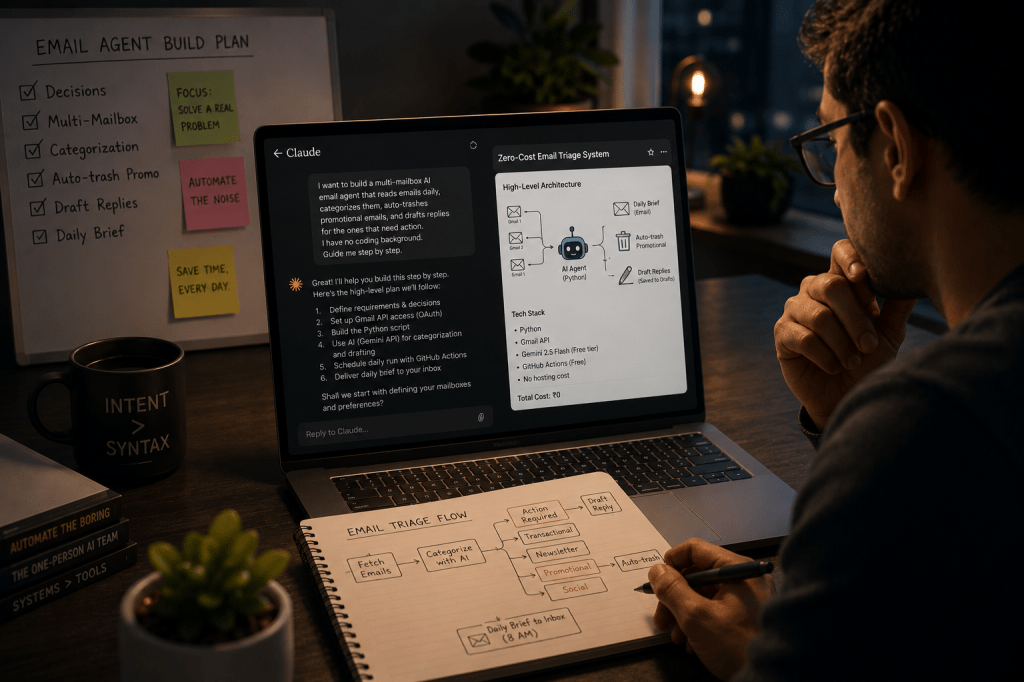
Recently, I have been using this framework myself and experimenting with simple agentic workflows. Following the four steps from last week, and with Claude helping me refine prompts and think through edge cases, I was able to set up a daily email briefing workflow in one afternoon.
I will show you exactly how I built it.
But first, let us talk about the tools.
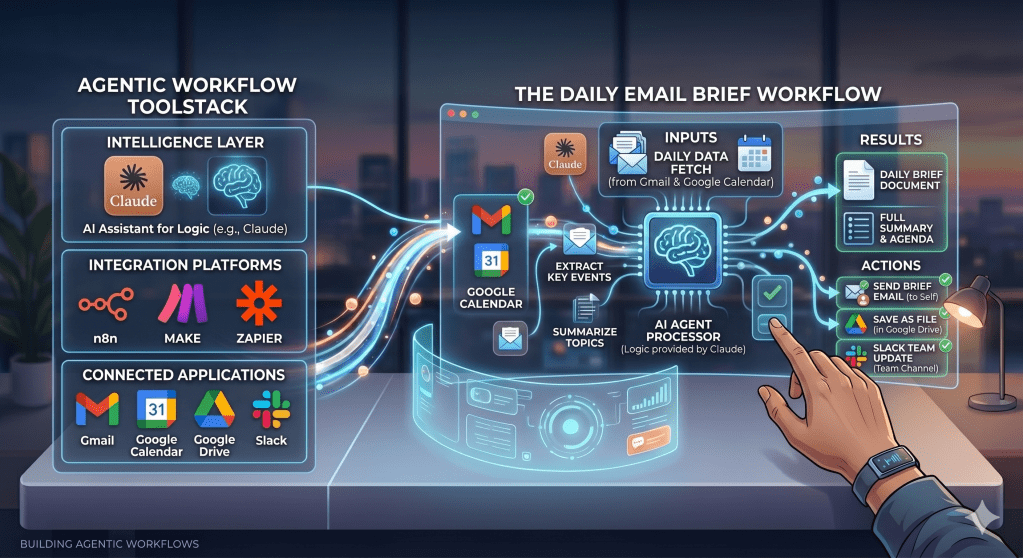
The Tools Landscape: What You Are Actually Choosing Between
When most people decide to build their first agentic workflow, they immediately go searching for the “best” tool.
They land on n8n, or Make, or Zapier, or one of a dozen other platforms.
They watch a YouTube video. They stare at a blank canvas. And then nothing gets built.
The problem is not the tool. The problem is starting with the tool before understanding what category of tool you actually need.
There are three categories worth knowing about right now.
Category 1: Automation Platforms
These are tools like n8n, Make, and Zapier. Think of them as visual plumbing systems. You connect App A to App B by dragging connectors between them on a canvas. When something happens in App A, something automatically happens in App B.
Example: When a new email arrives with the word “invoice” in the subject, automatically save the attachment to a specific Google Drive folder and send yourself a Slack notification.
These platforms are powerful and flexible. But they require you to think in flows and logic from the very beginning. If you have never built a workflow before, staring at a blank canvas is genuinely intimidating. You need to know what you want to connect before you start connecting things.
Category 2: AI Assistants With Integrations
This is where things get interesting for people who are not developers.
Tools like Claude now support something called MCP, which stands for Model Context Protocol. Ignore the technical name. Here is what it actually means in plain language.
Normally when you use Claude, it can only work with what you paste into the chat. It has no visibility into your Gmail, your calendar, your files, or any other tool you use. MCP changes that. It creates a secure connection between Claude and your real tools so Claude can actually read your Gmail, access your Google Drive, check your calendar, and more.
The key difference from automation platforms is how you interact with it. With n8n or Zapier, you configure flows visually. With Claude plus MCP, you just talk. You tell Claude what you want in plain language and it figures out how to do it using whichever tools it is connected to.
Example: “Read all emails from the last 24 hours and give me a categorised briefing by priority” — Claude connects to Gmail, reads your inbox, and delivers the briefing. No canvas. No connectors. No configuration beyond the initial setup.
This is the lowest barrier entry point for someone building their first workflow but this is still manual. You give a command and it will get the brief at that time.
Category 3: Agentic Desktops
The newest category and the one most relevant if you are on a Mac.
Claude Cowork is Claude’s desktop application that goes one step further than the chat interface. It can execute tasks autonomously, work with files on your computer, and most importantly for our purposes, run tasks on a schedule. You tell it what to do and when to do it, and it runs without you being there to trigger it manually.
This is the piece that turns a one-time manual task into an actual agentic workflow.
Think about what that means in practice. Without Cowork, the email briefing example from Category 2 works like this: you open Claude every morning, type the command, wait for the output, and read it. You are still in the loop as the trigger. The AI is doing the work but you are still starting the engine every day.
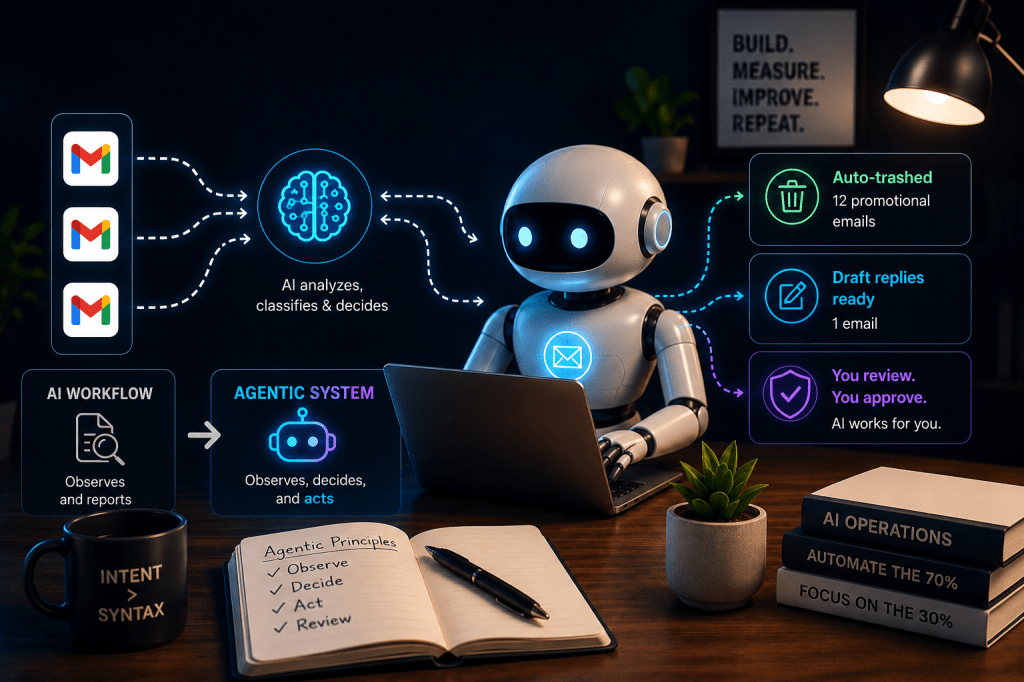
With Cowork’s scheduled tasks, you set it up once. Every morning at 8am, Claude connects to your Gmail, reads the last 24 hours of emails, categorises them, and delivers your briefing. You wake up and the work is already done. You did not trigger it. You did not supervise it. You just open Cowork and the briefing is sitting there waiting for you.
That is the difference between AI assisted and AI agentic. The task is no longer dependent on you remembering to ask. The agent owns the trigger.
So Which One Should You Start With?
For your first workflow, my recommendation is Claude plus Gmail MCP plus Claude Cowork.
Here is why. You might already know how to talk to Claude so the learning curve for the AI layer is zero. MCP setup is a one-time configuration. And Cowork handles the scheduling so the workflow runs every morning without you having to remember to trigger it.
Compare that to learning n8n from scratch. Both get you to the same destination. One gets you there this afternoon.
Once you have built and run your first workflow for a few weeks, then explore n8n and Make. By then you will know exactly what you want to build and the canvas will not feel empty anymore.
But remember the tool is only as efficient as the brief and guardrails. Let me show you how I built my daily email briefing using the Vibe Managing 101 foundation from last week.
How I Built It: Following The Framework
I did not skip steps. I ran every step from last week on myself.
Step 1: Audit
I asked myself the filter question. What did I do last week that I will do again this week in roughly the same way using roughly the same inputs?
Email triage. Every morning. Same inbox. Same categories of noise. Same mental effort of sorting what matters from what does not. Repetitive, rule-based, data-driven. Agent candidate confirmed.
Step 2: Write The Brief
This is where most people skip straight to opening a tool. I wrote the brief first.
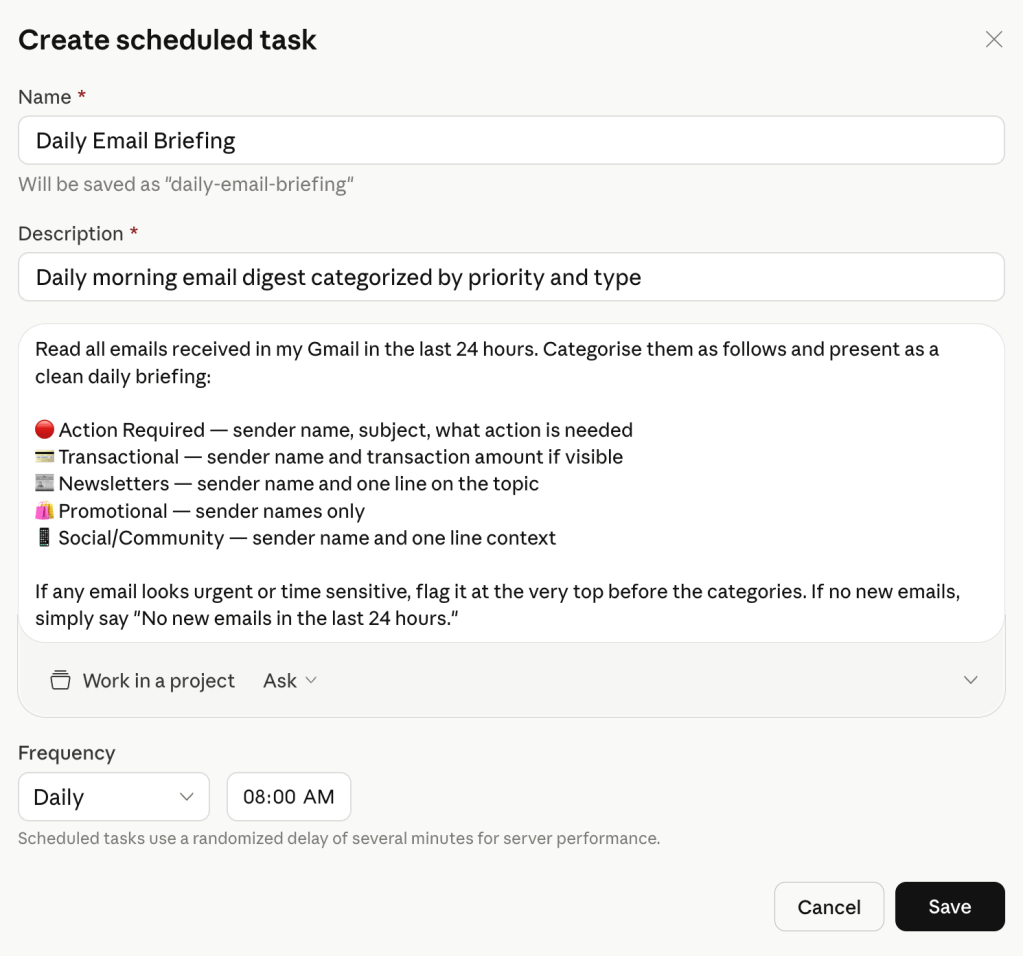
Here is the exact prompt I used:
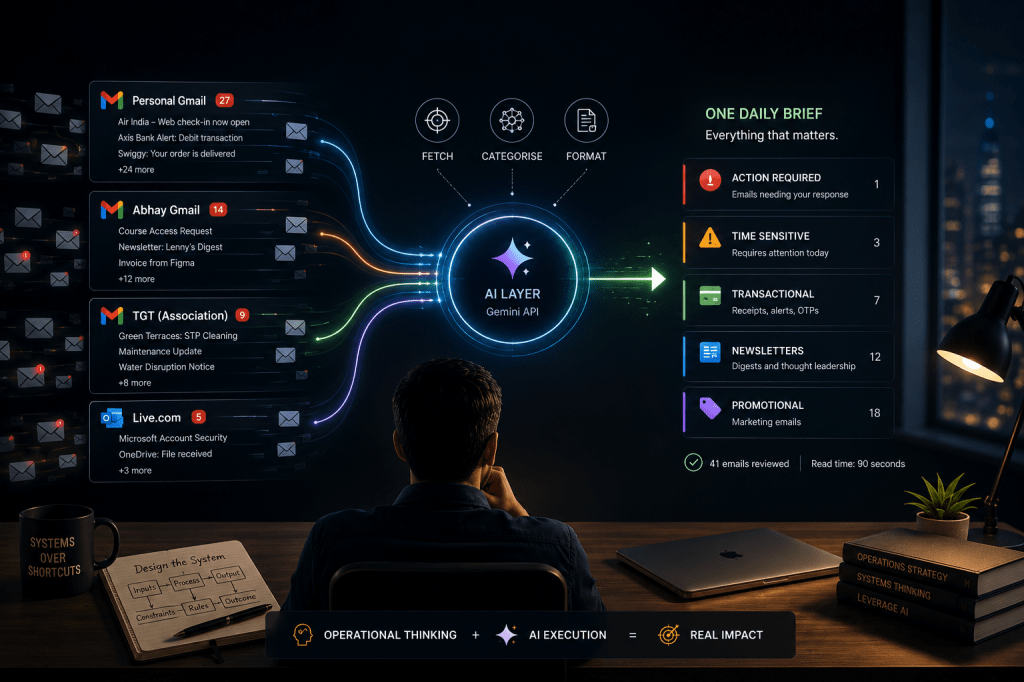
“Read all emails received in my Gmail in the last 24 hours. Categorise them as follows and present as a clean daily briefing:
Action Required: sender name, subject, what action is needed Transactional: sender name and transaction amount if visible Newsletters: sender name and one line on the topic Promotional: sender names only Social/Community: sender name and one line context
If any email looks urgent or time sensitive, flag it at the very top before the categories. If no new emails, simply say No new emails in the last 24 hours.”
Notice what I did. Specific categories. Specific output format for each one. Escalation rule built in. Failure behaviour defined.
I did not write this prompt from scratch by the way. I asked Claude to help me write it based on what I wanted as an output. That is the point. You do not need to know how to prompt engineer. You need to know what you want. Claude handles the syntax.
Step 3: Set The Guardrails
Before connecting anything, I answered the four guardrail questions from last week:
- Access: Gmail read only. No sending, no deleting, no replying.
- Autonomous actions: Categorise and summarise only. Nothing else.
- Escalation trigger: Anything urgent surfaces at the top before categories.
- Failure behaviour: If no emails, say so. Do not guess or fabricate.
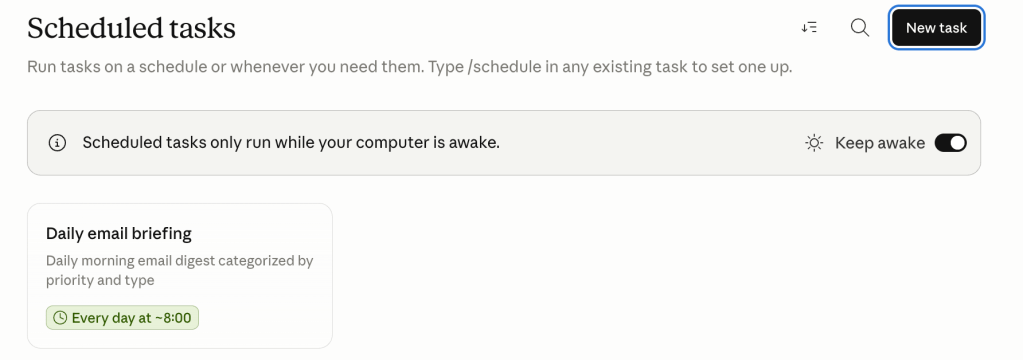
One guardrail I discovered only while setting up the scheduled task: Claude Cowork scheduled tasks only run while your computer is awake. That is not a bug. That is a production reality you need to design around. If your Mac goes to sleep before 8am, your briefing does not run.
The fix is simple. Cowork has a built in “Keep awake” toggle right on the scheduled tasks screen. Turn it on and Cowork handles it automatically. If you prefer the system level fix, go to System Settings, then Displays, and turn on “Prevent automatic sleeping when the display is off.” Either way it is a thirty second fix.
This is exactly the kind of thing that never appears in demo videos.
Step 4: Build The Review Rhythm
Five minutes every morning. Check what the briefing produced. If a category is wrong, note it and go back to the brief. The fix is always in the brief, never in the tool.
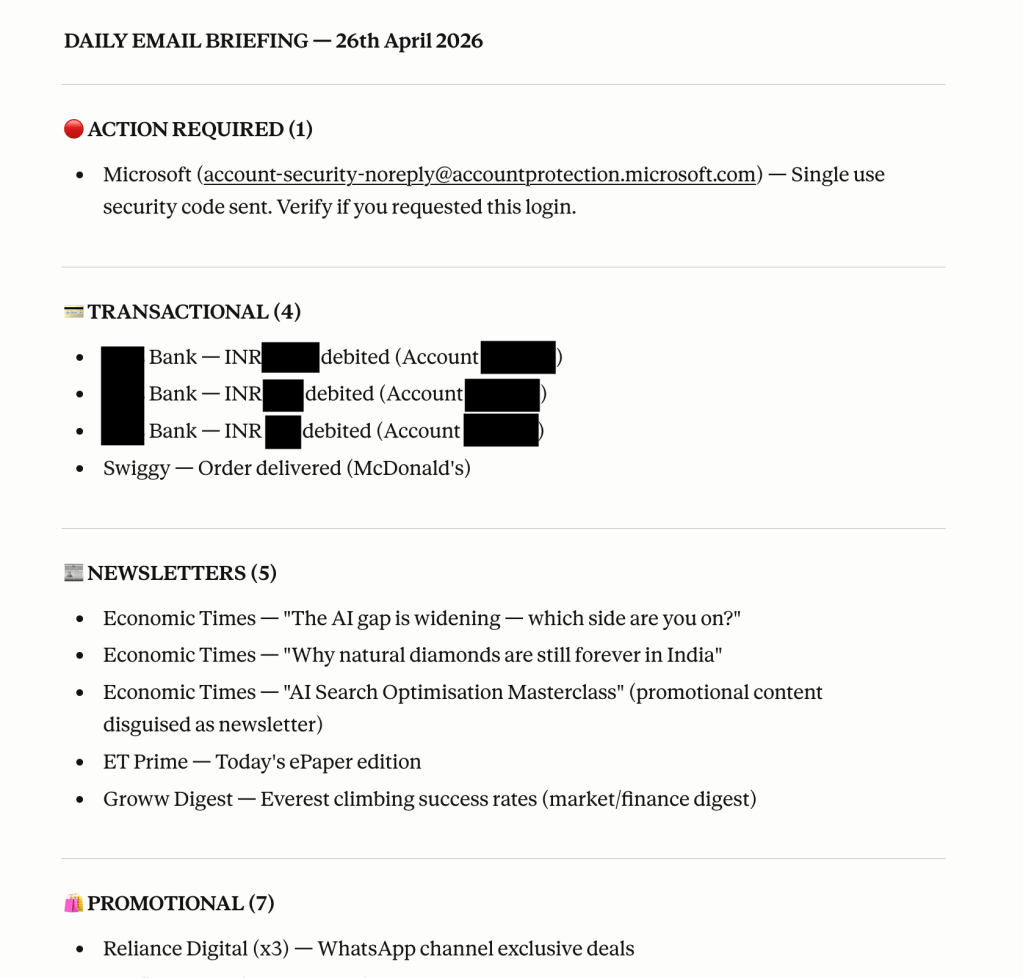
What The Output Actually Looked Like
When I got my daily briefing it flagged a Microsoft security code as Action Required and surfaced a society management notice that would have been buried under 15 promotional emails. Both would have cost me time to find manually. The agent found them in seconds.
Setup Screen view
What This Is And What It Is Not
I want to be precise here because the internet is full of people overselling what agentic tools can do today.
This is a semi-automated workflow. Claude connects to my Gmail, reads it, categorises it, and delivers a briefing every morning at 8am as long as my computer is awake. That is real and genuinely useful.
This is not a fully autonomous agent running in the cloud 24/7 whether you are there or not. That level of reliability requires additional setup that I will cover in a future piece as I progress further on this learning journey with you.
The gap between what works in demos and what works in production is real. Naming it honestly is more useful to you than pretending it does not exist.
Your Assignment This Week
Pick one task from your audit list. Not the most complex one. The most repetitive one.
Write the brief before you open any tool. Define the guardrails before you connect anything.
Then come back and tell me what you built.
Like many of you, I spent years assuming agentic AI required developers, infrastructure, or deep technical knowledge.
This workflow took one afternoon.
The tools are ready. The barrier is not technical anymore.
The barrier is deciding to start.
Found this useful? I’ll be breaking down more practical strategies for operationalizing AI in future editions of The Abhay Perspective. Subscribe below and also to my Newsletter on LinkedIn to get more such updates.
If you want to bring this conversation into your organisation, reach out via: https://theabhayperspective.com/work-with-me/


Leave a comment